AUPWIT Wraps Up ALUMINIUM 2026 in Düsseldorf
13 October, 2026


So you have purchased a hydraulic briquetting machine for your metal recycling operation. The machine has arrived, and now comes the important step: installation.
Getting this step right is just as important as choosing the right equipment. A properly installed machine runs reliably, produces consistent briquettes, and stays safe for years.
A rushed or careless installation, on the other hand, leads to downtime, poor briquette quality, and unnecessary wear on components.
This guide walks you through the complete installation process for a hydraulic metal briquetting machine. We will cover everything from site preparation and unpacking to electrical connections, hydraulic system setup, testing, and operator training.
A quick note before we start: every machine is different. Always refer to the specific instruction manual provided by your manufacturer. The following steps are general guidelines that apply to most hydraulic briquetting presses.
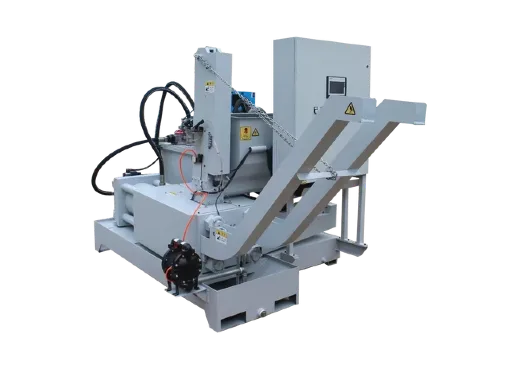
Before the machine even arrives at your facility, you need to get a few things in order. Proper preparation saves time and prevents complications later.
Choose a location that is dry and well-ventilated, with a level, sturdy base. The floor must be capable of supporting the weight of the machine, raw material storage, and finished briquettes. Ensure there is enough clearance around the machine for operation, maintenance, and material handling. A cramped workspace makes both installation and daily operation more difficult.
Gather the necessary tools before installation begins.
| Tool | Purpose |
|---|---|
| Wrenches | Tightening bolts and fittings |
| Screwdrivers | Electrical connections |
| Spirit level | Checking machine levelness |
| Forklift or crane | Positioning the machine |
Check the manufacturer’s recommendations for any specialized tools that may be required.
Verify that your facility has the correct voltage and amperage to meet the machine’s requirements. If you are unsure, have a certified electrician check the wiring before installation begins. Inadequate power supply is a common cause of operational issues that can be avoided with a simple pre-installation check.
Once the machine arrives, take the time to inspect it thoroughly before signing off on delivery.
Carefully remove the machine from its packaging. Check for any visible damage that may have occurred during shipping. Dents, cracks, or bent components are red flags that should be recorded right away.
Verify that all parts and accessories are present. Compare the contents against the packing list provided by the manufacturer. Missing components can delay installation significantly, so it is better to identify shortages early.
With the machine unpacked and inspected, it is time to get it positioned and secured.
Ensure the foundation is level, sturdy, and capable of supporting the machine’s weight. For heavier hydraulic briquetting presses, a concrete base is often required. Follow the machine’s specifications for foundation dimensions and reinforcement.
Based on your on-site conditions, place the machine close to the designated installation location. Use a forklift or crane to position it precisely according to the layout plan. Take your time with this step; proper alignment from the start prevents vibration and uneven wear during operation.
Bolt the machine to the foundation using the bolts provided. Check for levelness using a spirit level and adjust as necessary. An unlevel machine will produce inconsistent briquettes and speed up wear on parts. Fasten all connection screws securely.
Electrical work is one of the most critical parts of the installation. Mistakes here can damage the machine or create serious safety hazards.
Follow these key steps for electrical connections:
For a hydraulic briquetting press, this step is where the power system comes together.
Attach hydraulic hoses according to the manufacturer’s diagram. Check each connection carefully for leaks. Even a small leak can lead to pressure loss and reduced briquette quality over time.
Fill the hydraulic system with ISO-VG46 hydraulic oil. Observe the liquid level gauge and continue filling until the level reaches the top of the gauge. Using the wrong type of fluid can damage seals and reduce system performance.
Check all lubricating parts as well to ensure they are properly greased before operation.
With the machine physically installed and connected, it is time to configure it for your specific application.
Install any necessary attachments, such as feeders or conveyors, to move material from storage into the machine’s feed hopper. Adjust key settings including compression pressure, feed rate, and cycle time based on the material you plan to process. Steel chips require different pressure settings than aluminum or copper.
Calibrate all sensors according to the manufacturer’s specifications. Test the control panel to ensure it displays accurate readings. If the machine includes a temperature regulator, set it to the required level.
Do not put the machine into full production immediately. A proper trial run identifies issues before they become costly problems.
Start the machine according to the manufacturer’s instructions and run it without any material for a short period, typically around three minutes. During the no-load test, check for the following:
If you notice any abnormality, stop the machine immediately and troubleshoot before proceeding.
Once the machine passes the no-load test, feed a small amount of material to test briquette formation. During the load test, follow these steps:
After the test is complete, the machine is ready for operation.
With the machine running successfully, it is time to fine-tune and prepare your team.
Make any final adjustments based on the machine’s performance during the trial run. Small tweaks to pressure, feed rate, or cycle time can make a significant difference in briquette quality and throughput.
Provide thorough training for operators on safe operation and routine maintenance. Ensure they understand all safety procedures, including emergency stop protocols and proper shutdown sequences.
Before stopping the machine, ensure there is no material left in the feed hopper. After stopping, reverse the direction of movement for about one minute to discharge any remaining material inside the screw propeller (the auger that feeds material into the compression chamber).
Record all settings, adjustments, and any issues encountered during installation. This documentation serves as a valuable reference for future troubleshooting and maintenance.
Provide a full report of the installation process to the operational team. Hand over all manuals, warranty documents, and other relevant paperwork. A thorough handover ensures that the team responsible for daily operation has everything they need to keep the machine running smoothly.
Installation is not the end of the story. A well-maintained machine stays productive for years.
Important safety rule: Always switch off the power first when carrying out repairs on any machine.
The maintenance recommendations provided here serve as a general guide. They do not cover every situation. Additional attention may be required based on your company’s specific guidelines or usage conditions. For more detailed information, contact the manufacturer for guidance.
Establish a regular maintenance routine based on the manufacturer’s recommendations. The table below provides a general guideline for maintenance frequency.
| Frequency | Tasks |
|---|---|
| Daily | Check hydraulic fluid level, inspect for leaks, verify briquette quality |
| Weekly | Clean machine surfaces, check electrical connections, inspect seals |
| Monthly | Change hydraulic fluid, inspect filters, test emergency stops |
In addition to regular inspections, certain lubrication points require attention at specific intervals.
| No. | Name | Lubricating Oil | Frequency of Lubrication |
|---|---|---|---|
| 1 | Chains for lifting machine | Grease | Monthly |
| 2 | Grease nipple of reducer | Grease | Once every three months |
Regular maintenance prevents unexpected breakdowns and extends the life of your hydraulic briquetters. Always refer to your specific machine’s manual for detailed maintenance procedures.
Installing a hydraulic briquetting machine is a step-by-step process that follows a clear sequence. Site preparation comes first, followed by unpacking, foundation work, electrical and hydraulic connections, calibration, testing, and finally operator training. Each step must be completed before moving to the next.
The key takeaways are straightforward:
Aupwit has been manufacturing hydraulic equipment since 2008, offering Single Output, Double Output, and Vertical briquetting presses for metal chip recycling. Whether you are processing steel, cast iron, aluminum, or copper chips, proper installation is the foundation of reliable, high-performance briquetting. Contact us if you need professional installation support or guidance on choosing the right briquetting solution for your operation.

This website uses cookies to improve your experience while you navigate through the website. Out of these, the cookies that are categorized as necessary are stored on your browser as they are essential for the working of basic functionalities of the website.
We also use third-party cookies that help us analyze and understand how you use this website. These cookies will be stored in your browser only with your consent. You also have the option to opt-out of these cookies. But opting out of some of these cookies may affect your browsing experience.